Tenant to Tenant Intune Device Migration: Beginning of a Series
This one has been a long, long time in the making. In the coming days, I’m going to be releasing a series of posts that detail how to migrate an Intune managed, Windows PC from one Azure AD tenant to another… without wiping the device!
Edit: it’s been a few weeks and we’ve covered a lot of pieces. Here is a quick ‘table-of-contents’ to the series.
Part 1: The Orchestrator - Detailing the primary PowerShell script that runs the migration process
Part 2: The Tasks of Rebooting and Restoring - An introduction to the role tasks play in the process and a deep-dive into the first two tasks
Part 3: A Group Tag Without Autopilot - Learn how to use the Microsoft Graph API to add a group tag to an Azure AD object without Autopilot registration
Part 4: The Bulk Token - Covers the creation of the provisioning package and bulk primary refresh token
Part 5: The Primary User - Details of the task that sets the primary user attribute in the destination Intune tenant
Part 6: The Last Tasks - Walkthrough of the Autopilot registration and BitLocker key escrow tasks
Part 7: Go Time - Putting it all together
LIVE DEMO - Walkthrough of end user process on our YouTube channel

Why are we doing this?
As more and more organizations adopt Intune to manage PCs, this was an inevitable scenario. Companies can split into several companies, business acquire new businesses, organizations divest; all reasons you may need to move a PC to a different tenant. This isn’t new, as Active Directory domain migrations are a prevalent process.
But when your PC is Azure AD joined, Autopilot registered, and Intune managed, the only way to move it is to wipe or reimage the device, de-register it from Autopilot, and start all over again in the new tenant. Well, the only “official” way as supported by Microsoft.
Wiping a PC, re-registering it, and waiting for it to go through the Autopilot provisioning process again probably takes a minimum of 2 hours, at best. At worst, you could have users going a whole day or more without a working machine. That’s not good. At least that’s what a large customer of mine thought about 3 years ago when they were facing a divestiture.
This customer had roughly 15,000 Windows machines deployed via Autopilot and Intune. Due to the divestiture, about half of those users would now belong to a new Azure AD tenant, and their PC would need to move to a new Intune environment as well. While evaluating how to move PCs, they were very clear that any extended downtime was unacceptable, despite Microsoft stating this is “just how the process works”.
The customer asked me if there was anyway to automate this process to streamline it and make the end user experience as quick and painless as possible. After some tinkering, Jesse (my lead solutions architect) and I came up with a workable solution. It wasn’t perfect, but it worked, requiring nothing more than one reboot. This more than satisfied our customer’s ask.
Since that time, we have been gradually refining the process, adding more capabilities and automating more pieces. Finally, I believe it is at a point where it can be shared and hopefully help those who are in a similar situation.
Who can use this?
If you’ve made it this far, or have had any hands-on experience with Intune, you’re probably wondering what we did to accomplish this crazy task. Let’s start with some assumptions, before getting into to the actual solution.
For clarity’s sake, we will be referring to the two Azure tenants as Tenant A and Tenant B.

Tenant A will be the source, or original tenant from which we are migrating from.
Tenant B will be the target, or destination tenant from which we are migration to.
We will assume the following about Tenant A:
Users have a minimum license of Intune and Azure AD Premium P1
Devices are registered in Autopilot
Devices are Azure AD joined (not local Active Directory joined)
Devices are enrolled in Intune
Now with any migration, an actual migration has to occur. Let’s make the following assumptions about that migration:
New identities have been created for users in Tenant B
User data has been staged and transitioned to Tenant B
We will then assume the following about Tenant B:
Users have a minimum license of Intune and Azure AD Premium P1
Intune has been configured to support the desired configurations, applications, and policy to support devices
What did we do?
With the assumptions in place, let’s break down how the process works. Like most cool things with Intune, we are accomplishing the migration with a series of scripts. Here is the high-level overview of how we’re performing the migration:
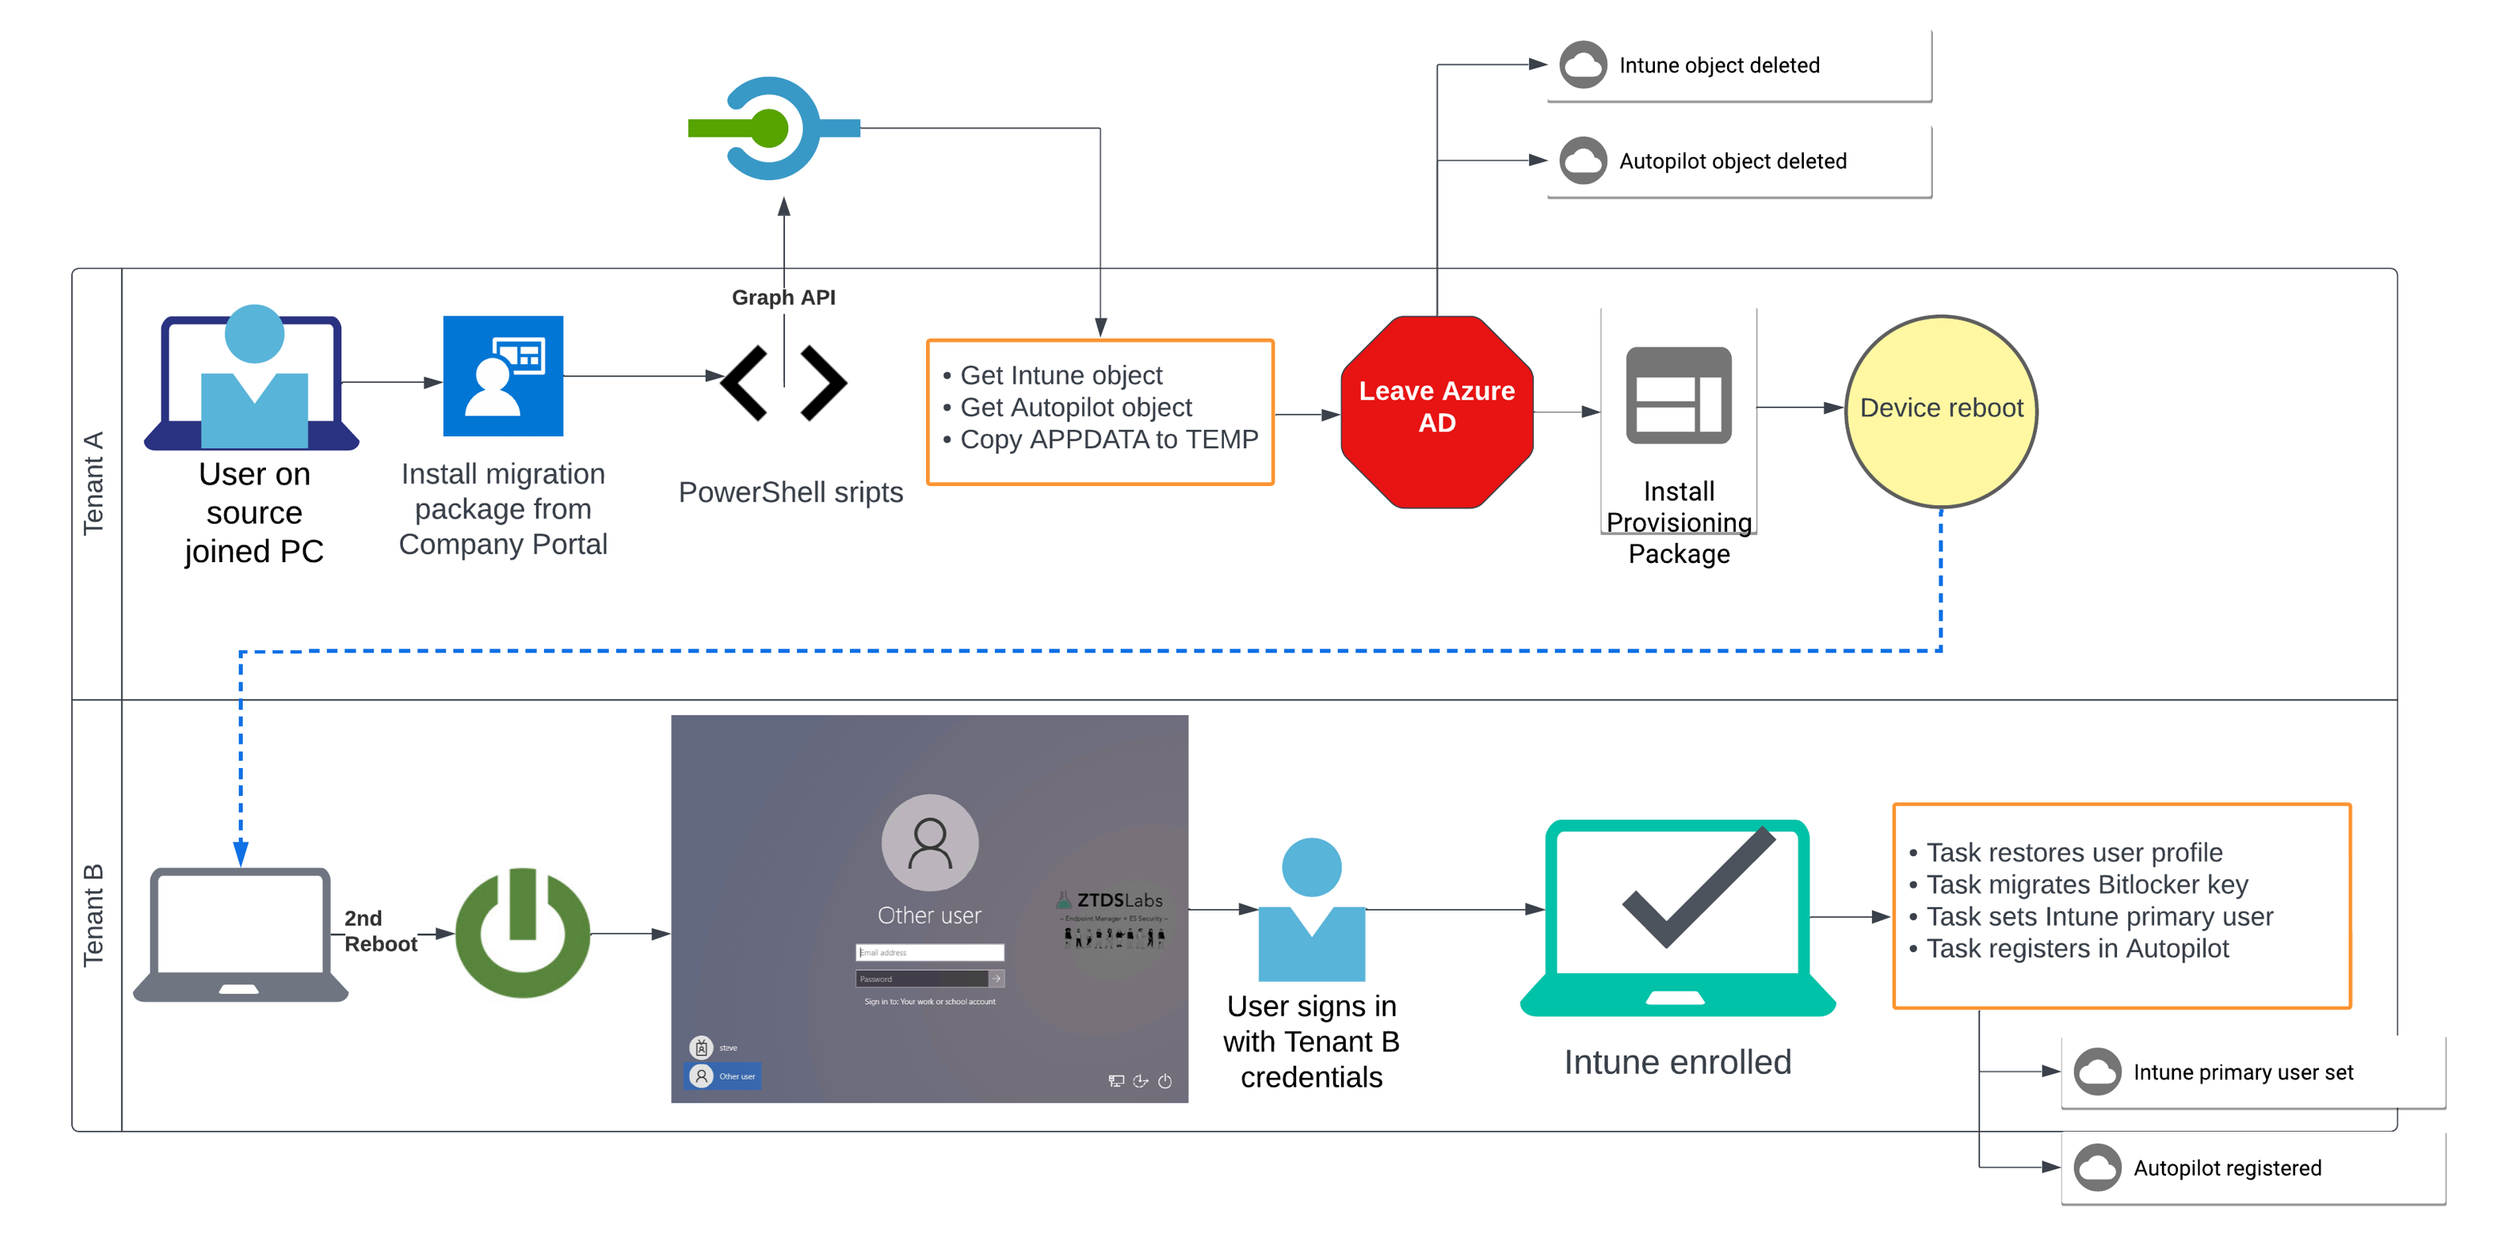
Migration app package (.intunewin) is made available to users via the Intune Company Portal.
User installs the migration app
Application unpacks series of scripts to the local PC and begins running the primary PowerShell script which performs the following:
Authenticates to Tenant A using Microsoft Graph API with app registration
Collects device information from Tenant A
Copy %APPDATA% and %LOCALAPPDATA% to a temporary location
Remove previous MDM enrollments from registry
Stage post migration tasks
PC leaves Azure AD of Tenant A
Intune object deleted from Tenant A
Autopilot object deleted from Tenant A
User is prompted that they will be signed out in 1 minute.
Device reboots, and then subsequently reboots again in 30 seconds
User signs in with Tenant B credentials
PC is Azure AD joined and Intune enrolled to Tenant B
Task runs to restore %APPDATA% and %LOCALAPPDATA% items new profile
Authenticate to Tenant B using Microsoft Graph API with app registration
Task runs to set the primary user of the device within Intune
Task runs to migrate the BitLocker Key to Tenant B Azure environment
Task runs to register device in Tenant B Autopilot with Group Tag attribute from Tenant A
What is needed?
So what do you need to do this? Well here are individual pieces we’re going to be covering in the next few posts:
App Registrations: App registrations are created in both Tenant A and Tenant B. This will be the primary means of authenticating objects throughout the various scripts used in the process.
Scripts: There are several scripts that are used during the process which will need to be modified for organization specific values such as the app registration info, tenant IDs, Autopilot group tags, etc.
Align XML Tasks to PowerShell Scripts: The PowerShell scripts run at various context levels, but most are as SYSTEM, or NT\AUTHORITY. To achieve this, each PowerShell script will have an accompanying XML file to set a scheduled task in Windows that will run the script with the appropriate context. There is also quite a bit of sequencing, so the tasks will allow us to set the correct timing intervals we want each piece to run at, both pre and post migration.
Windows Provisioning Package: This is the crux of the entire process. We use the Windows Configuration Designer tool to create a .PPKG file, which is used to deliver an Azure AD Bulk Primary Refresh Token (BPRT). The package is what binds the device to Tenant B after being removed from Tenant A
Cleanup: As I said, there are pre and post elements to the migration, and they need to be sequenced carefully. Our scripts ensure that at the appropriate times, Intune and Autopilot objects in Tenant A are being deleted to allow for the enrollment and registration to Tenant B.
Validate virtually: I’ve said this before, but using virtual machines (VM) to test this process is critical. Ensure you have several VMs to test with and 1 or 2 accounts in Tenant A that have a counterpart identity in Tenant B. This testing is also a great time to document the end user experience, which is critical to the whole operation.
What now?
I know, I know… we are all anxious to get started here. In our next post, (officially Part 1), we’re going to start with the app registrations and permissions.